簡単解説!docker composeでNGINX App Protect WAFをデプロイする方法
docker compose を使ってコンテナを作成するブログの第二弾です。今回は、WAF をコンテナ化します。以前のブログでは NGINX Plus をコンテナ化しました。本ブログでは NGINX Plus アドオン NGINX App Protect WAF をコンテナ化します。NGINXとしての機能に WAFの機能を追加したコンテナです。本ブログを参照してWAFを体験しましょう!
今回のテーマは WAFのコンテナ化 です。
今ある環境を大きく崩さずにWAF(Web Application Firewall)を試してみたい、導入してみたい、という場合には コンテナへのデプロイが最適です。そして、コンテナ化が容易なのが NGINX App Protect WAF です。メーカーサイトには、Dockerfileなどが用意されており、コピペするだけで 概ねコンテナのWAF が使えるようになります。
ゴールは NGINX App Protect WAFのインストール まで です。
- ファイルとディレクトリの構成
- コンテナイメージ作成するためのDockerfileの準備
- docker-compose.yml ファイルの準備
- NGINXの設定ファイルとコンテンツの準備
- コンテナイメージの作成とコンテナの作成
- 攻撃リクエストでログ確認
はじめに
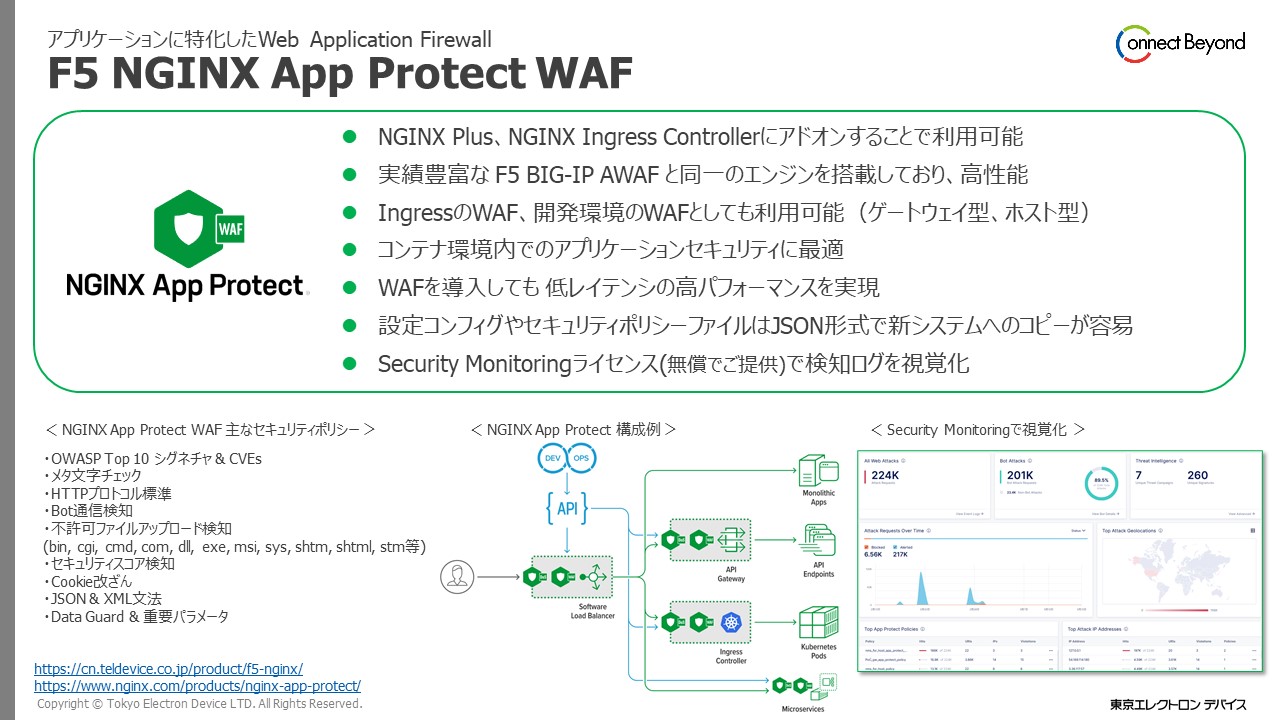
ここで、NGINX App Protect WAFについて簡単に紹介します。
NGINX App Protect WAF は、NGINX Plusにアドオンとして機能追加が可能なWAF製品です。オンプレ・クラウドなどデプロイ先を選ばず導入することができます。
また、NGINX App Protect WAF は ワールドワイドで利用されている F5 BIG-IP AWAFのエンジンを移植していますので、高機能・高性能なWAFとなっています。
-
- F5 WAFテクノロジーが搭載されたモダンアプリケーションセキュリティです。NGINX Plusに追加することで、アプリケーションやAPIのセキュリティを高め、システムの停止やセキュリティ侵害を回避します。また、他のオープンソースソフトウェアや他社競合製品よりも高いパフォーマンスを提供します。
-
NGINX Plusとは
- NGINXは、Web環境に特化した オール・イン・ワン の アプリケーション デリバリー ソリューション です。簡単に言うと、Webサーバー・プロキシサーバー・ロードバランサーなどの機能をもつソフトウェアです。無償のNGINX OSS(オープンソースソフトウェア)をご利用の方も多いと思いますが、NGINX Plus は有償であり、NGINX OSS版の機能を踏襲し、そこにエンタープライズ向けの機能を搭載した「 メーカーサポート付きのNGINX 」となります。
- ご参考:ブログ 「NGINX Plusを選択するポイントとは」
-
NGINX Plus をコンテナ化する当サイトの記事も参照してみてください。
環境
Ubuntu 22.04 + Docker Engine 24.0.1 + docker compose 2.18.1 + NGINX App Protect WAF Release 4.3 です。NGINX App Protect WAF の nginx-repo.crt と nginx-repo.key の2つライセンスファイルも事前に用意します。
★NGINX App Protect WAF を試してみたい方へ★
東京エレクトロンデバイスではNGINX Plus Add-on NGINX App Protect WAF の無償の30日間のトライアルライセンスを提供しています。お申し込みは、こちら の「無償トライアルライセンス申し込み」 からお願いします。
1. ファイルとディレクトリの構成
- ディレクトリとファイルの構成です。
├── Dockerfile.alpine.r4.3
├── conf.d
│   ├── custom_log_format.json
│   ├── custom_security_policy.json
│   └── default.conf
├── docker-compose.yml
├── .env
├── files
│   ├── entrypoint.sh
│   └── nginx.conf
├── html
│   └── index.html
└── ssl
2. コンテナイメージ作成するためのDockerfileの準備
NGINX Docs というメーカーサイトで用意されている Dockerfile を参考に少しだけ変更しています。
-
Dockerfile.alpine.r4.3 : NGINX App Protect WAF Release 4.3用のDockerfileです。
# syntax=docker/dockerfile:1
# For Alpine 3.16:
FROM alpine:3.16

# Download and add the NGINX signing keys:
RUN wget -O /etc/apk/keys/nginx_signing.rsa.pub https://cs.nginx.com/static/keys/nginx_signing.rsa.pub \
 && wget -O /etc/apk/keys/app-protect-security-updates.rsa.pub https://cs.nginx.com/static/keys/app-protect-security-updates.rsa.pub

# Add NGINX Plus repository:
RUN printf "https://pkgs.nginx.com/plus/alpine/v`egrep -o '^[0-9]+\.[0-9]+' /etc/alpine-release`/main\n" | tee -a /etc/apk/repositories

# Add NGINX App-protect repository:
RUN printf "https://pkgs.nginx.com/app-protect/alpine/v`egrep -o '^[0-9]+\.[0-9]+' /etc/alpine-release`/main\n" | tee -a /etc/apk/repositories \
 && printf "https://pkgs.nginx.com/app-protect-security-updates/alpine/v`egrep -o '^[0-9]+\.[0-9]+' /etc/alpine-release`/main\n" | tee -a /etc/apk/repositories

# Update the repository and install the most recent version of the NGINX App Protect WAF package (which includes NGINX Plus):
RUN --mount=type=secret,id=nginx-crt,dst=/etc/apk/cert.pem,mode=0644 \
    --mount=type=secret,id=nginx-key,dst=/etc/apk/cert.key,mode=0644 \
    apk update && apk add \
        app-protect=29.4.279.0-r1 \
        nginx-plus-module-appprotect=29.4.279.0-r1 \
        app-protect-plugin=5.1.0-r1 \
        app-protect-engine=10.271.0-r1 \
        app-protect-graphql=0.7.0-r1 \
        app-protect-compiler=10.271.0-r1 \
        app-protect-common=10.271.0-r1

# Forward request logs to Docker log collector:
RUN ln -sf /dev/stdout /var/log/nginx/access.log \
    && ln -sf /dev/stderr /var/log/nginx/error.log

# Copy configuration files:
COPY files/nginx.conf /etc/nginx/
COPY conf.d/custom_log_format.json /etc/nginx/
COPY files/entrypoint.sh /root/

CMD ["sh", "/root/entrypoint.sh"]
3. docker-compose.yml ファイルの準備
docker-compose.ymlの準備
docker-compose.yml は、docker compose で読み込まれる設定ファイルです。
-
docker-compose.yml の中で
${NGXPORT}、${LICENSE_KEY}、${LICENSE_CRT}を環境変数として設定しています。環境変数の実際の値は、次項の .env ファイル内で指定します。version: '3.9' services: nap: build: context: . dockerfile: ./Dockerfile.alpine.r4.3 secrets: - nginx-key - nginx-crt container_name: nap-alpine hostname: nap-alpine volumes: - ./html:/usr/share/nginx/html - ./conf.d:/etc/nginx/conf.d - ./ssl:/etc/nginx/ssl ports: - ${NGXPORT}:80 - 8443:443 secrets: nginx-key: file: ${LICENSE_KEY} nginx-crt: file: ${LICENSE_CRT}
docker composeで引き渡す環境ファイル .env ファイルの準備
-
環境ファイル .env は自動で読み込まれます。LICENSE_CRT と LICENSE_KEY の値は、ライセンスファイルのディレクトリ情報とファイル名です。お持ちのライセンスファイルのディレクトリ情報に置き換えてください。
NGXPORT=9940
LICENSE_KEY=/home/ubuntu/setup/nginx-repo.key
LICENSE_CRT=/home/ubuntu/setup/nginx-repo.crt
4. その他のファイル(NGINXの設定ファイル・コンテンツ・など)の準備
-
filesディレクトリにあるファイル
-
files/entrypoint.sh : コンテナ起動時に実行するシェルスクリプト
#!/bin/sh /bin/su -s /bin/sh -c "/usr/share/ts/bin/bd-socket-plugin tmm_count 4 proc_cpuinfo_cpu_mhz 2000000 total_xml_memory 307200000 total_umu_max_size 3129344 sys_max_account_id 1024 no_static_config 2>&1 >> /var/log/app_protect/bd-socket-plugin.log &" nginx /usr/sbin/nginx -g 'daemon off;' -
files/nginx.conf : 「load_module modules/ngx_http_app_protect_module.so;」 を追加します。追加する場所を誤ると、エラーとなりますのでご注意ください。
user nginx;
worker_processes  auto;

error_log /var/log/nginx/error.log debug;
load_module modules/ngx_http_app_protect_module.so;

events {
    worker_connections  1024;
}

http {
    include       /etc/nginx/mime.types;
    default_type  application/octet-stream;

    log_format  main  '$remote_addr - $remote_user [$time_local] "$request" '
                      '$status $body_bytes_sent "$http_referer" '
                      '"$http_user_agent" "$http_x_forwarded_for"';

    access_log  /dev/stdout  main;

    sendfile        on;
    #tcp_nopush     on;

    keepalive_timeout 65s;
    keepalive_requests 100;

    #gzip  on;

    server_names_hash_max_size 1024;
    server_names_hash_bucket_size 256;

    variables_hash_bucket_size 256;
    variables_hash_max_size 1024;

    include /etc/nginx/conf.d/*.conf;

}
-
-
conf.dにあるファイル
-
conf.d/default.conf : NGINXの設定ファイルでWAFの有効無効・セキュリティポリシーの指定・検知ログファイルの指定などを設定します。
コンフィグに関しては、ブログ 「NGINX WAFを試してみよう!(セキュリティポリシーの設定)」でも一部解説していますので参考にしてみてください。server { listen 80; app_protect_enable on; # WAFを有効 app_protect_security_log_enable on; # WAFのログを有効 app_protect_security_log "/etc/nginx/conf.d/custom_log_format.json" /var/log/app_protect/security.log; # WAFの検知ログファイル location / { add_header X-demo-id "demo-nap"; app_protect_policy_file "/etc/nginx/conf.d/custom_security_policy.json"; # WAFのセキュリティポリシーを定義 index index.html; root /usr/share/nginx/html; } } -
conf.d/custom_security_policy.json : WAFで検知するルール、つまり、セキュリティポリシーを定義しているファイルです。セキュリティポリシーをチューニングする対象のファイルとなります。このファイルを修正し、NGINX自体の設定読み込み(リロード)を実施すれば即、設定したポリシーが適用されます。
{ "policy": { "name": "nap-demo-policy", "template": { "name": "POLICY_TEMPLATE_NGINX_BASE" }, "applicationLanguage": "utf-8", "enforcementMode": "blocking" } } -
conf.d/custom_log_format.json : WAFで検知したセキュリティログ情報の設定ファイルです。
{
    "filter": {
        "request_type": "illegal"
    },
    "content": {
        "format": "default",
        "max_request_size": "any",
        "max_message_size": "10k"
    }
}
-
-
htmlにあるファイル
-
html/index.html : コンテンツファイルです。定番の文字を表示します。
Hello World.
-
5. コンテナイメージの作成とコンテナの作成
-
ファイルの準備が整いましたので docker composeを使って、コンテナを作成します。docker-compose.yml ファイルが置いてあるディレクトリで以下のコマンドを実行します。
sudo docker compose up -d
作成されたコンテナの確認
- composeで作成したコンテナの一覧を表示します。以下のコマンドを実行します。無事にコンテナが作成されていることがわかります。
sudo docker compose ps - 実行結果例
NAME                IMAGE                   COMMAND                  SERVICE             CREATED             STATUS              PORTS
nap-alpine          appprotect_alpine-nap   "sh /root/entrypoint…"   nap                 36 seconds ago      Up 36 seconds       0.0.0.0:9940->80/tcp, :::9940->80/tcp, 0.0.0.0:8443->443/tcp, :::8443->443/tcp
NGINX Plus と NGINX App WAF のバージョン確認
-
NGINX Plus のバージョン確認結果
sudo docker compose exec nap nginx -vR29であることが分かります。
nginx version: nginx/1.23.4 (nginx-plus-r29) -
NGINX App Protect WAF のバージョン確認結果
sudo docker compose exec nap cat /opt/app_protect/VERSION4.279.0 と出力されています。メーカーサイトの Release を確認すると Release 4.3 であることが分かります。
4.279.0
6. 攻撃リクエストでログ確認
それでは実際にWAFで検知できるかを確認してみましょう。
-
ホストから攻撃リクエストを投げて、NGINX App Protect WAFで防御できるかを確認します。
Path Traversalを検知・防御(ブロック)し、WAFの機能で検知時に表示されるデフォルトコンテンツが出力されました。WAFで管理している検知ログで検索可能なユニークIDとなる support ID が表示されています。$ curl -i localhost:9940/?a=../../../ HTTP/1.1 200 OK Content-Type: text/html; charset=utf-8 Connection: close Cache-Control: no-cache Pragma: no-cache Content-Length: 245 X-demo-id: demo-nap <html><head><title>Request Rejected</title></head><body>The requested URL was rejected. Please consult with your administrator.<br><br>Your support ID is: 153756759486812622<br><br><a href='javascript:history.back();'>[Go Back]</a></body></html> -
検知したセキュリティログを確認します。
コンテナ内のファイルを参照します。以下、ホストからコンテナ内の指定のファイルを参照する方法です。sudo docker compose exec nap cat /var/log/app_protect/security.log既出の support ID が分かれば、それをキーに検索しても良いかも知れません。検知ログには ソースIPアドレス・攻撃手法・シグネチャのIDなど多くの情報が含まれています。そのため、CLIでコマンドを実行して検知ログを確認するのは、少々骨が折れそうです。そんな時は、WebUIで視覚的に検知ログを見ることができる製品を利用しましょう。
以下は、出力結果の例となります。$ sudo docker compose exec nap cat /var/log/app_protect/security.log | grep 153756759486812622 attack_type="Non-browser Client,Path Traversal,Other Application Activity",blocking_exception_reason="N/A",date_time="2023-05-30 09:05:21",dest_port="80",ip_client="172.24.0.1",is_truncated="false",method="GET",policy_name="nap-demo-policy",protocol="HTTP",request_status="blocked",response_code="0",severity="Critical",...(以降割愛)
WebUIでWAFの検知ログを確認する方法
世の中にはログを参照するツールが多数ありますが、NGINX製品にも NGINX Management Suite という製品があり、その中の Security Monitoring module では検知ログを視覚的に参照することができます。
NGINX App Protect WAFを購入すると、なんと この Security Monitoring module のライセンスを無償で手に入れることができます。
NGINX Management Suiteに関しては、ブログでも詳細に紹介していますので参考にしてください。
まとめ
例えば、WAFの動作を確認したい、WAFのポリシーの設定方法を試したい、など とりあえず手っ取り早くWAF環境を用意したい、ということであれば、コンテナでWAFを実現するのが最もお手軽です。そして、docker composeでWAFをデプロイできるのであれば、より素早く環境を用意できます。
まだ、WAFに触れたことが無いという方のためにも、是非、本ブログを参考にコンテナでのWAFを試してみてください。

この記事の投稿者Nagaoka
F5製品を担当しているエンジニアです。
この記事をシェア