WSL2にDocker Engineをインストールして、コンテナにNGINX Plusをインストールしてみた
今回のブログは、「WSL2にDocker Engineをインストールして、NGINX Plusが入ったコンテナイメージを構築してみた」ので
私なりに調査して得られた経験を記事にしてみました。
はじめに
ブログをご覧いただきありがとうございます。
東京エレクトロンデバイスのJo Nishikawaです。
今回のブログは、「WSL2にDocker Engineをインストールして、NGINX Plusが入ったコンテナイメージを構築してみた」ので
私なりに調査して得られた体験などを交えた記事にしてみました。
※皆様の環境で同じ動作になる保証はございませんのでご留意ください。あくまで参考にしていただければと思います。
動機
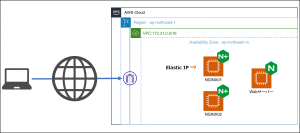
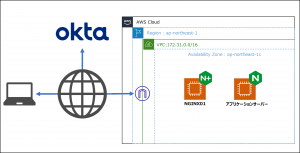
私の所属する部署ではAWSやAzureの検証環境がありますので、NGINX関連の検証や動作確認をする際はクラウド環境で実施することが多かったです(私は)。
ただ、インスタンス起動中に費用が発生したりインターネットに接続できない際に利用できないこともあるので気軽に動作確認をするには少々ハードルを感じておりました。
そこでパソコンのローカルにWSLをインストールしたまま放置していたな~と思いだしたので、せっかくだったらDockerもインストールしてコンテナ環境を気軽に触れるようにしちゃおうと思ったことが今回の動機となります。
また、Nagaokaさんの執筆された記事を読んでいてコンテナに触りたくなる内容でしたので、やる気に火が付きました。
簡単解説!docker composeでNGINX Plusをデプロイする方法
分かりやすく解説!DockerコンテナにNGINX Plusをデプロイする方法
簡単解説!docker composeでNGINX App Protect WAFをデプロイする方法
いざ、実践
WSL1からWSL2へ
WSLとUbuntu 20.04 LTSは既にインストール済だったので、Docker Engineをインストールしちゃえば、「すぐ検証環境出来るじゃん」と思いインストール状況の確認から始めました。
Windows PowerShellにて確認を進めました。ちなみにWindows10のパソコンを利用しています。
PS C:\WINDOWS\system32> wsl -l -v
Linux 用 Windows サブシステムには、ディストリビューションがインストールされていません。
ディストリビューションは Microsoft Store にアクセスしてインストールすることができます:
https://aka.ms/wslstore
あれ?確かにUbuntu-20.04 LTSがインストールされていてターミナルからアクセスもできるのになぜ表示されないんだろう?
と思い、アンインストールして再度インストールしたり、ストアからダウンロードしたり、コマンドでダウンロードしたり、コマンドプロンプトから確認したりとしましたが出力結果は一向に変わりませんでした。
マイクロソフトのページ通りにやってるのになんでだろう?としばらく悩みました。うーむ。。。
休憩を挟んだ後に、ダメもとでWindowsPowerShellを管理者権限で実行せずに立ち上げてコマンドを実行してみました。
PS C:\Users> wsl -l -v
  NAME            STATE           VERSION
* Ubuntu-20.04    Running         1
PS C:\Users>
あれ!?
公式ドキュメントや先人の方々のブログ記事には「WindowsPowerShellを管理者として実行」と必ずと言っていいほど記載があったのでその通りにしていましたが私の環境ではそれが良くなかったようです。
(大体の環境では管理者として実行すべきかと思います。)
Ubuntu-20.04のWSLバージョンがようやく表示されたので1から2に変更をかけます。
PS C:\Users> wsl --set-version Ubuntu-20.04 2

変換中です。この処理には数分かかることがあります...
WSL 2 との主な違いについては、https://aka.ms/wsl2 を参照してください
PS C:\Users>
PS C:\Users> wsl -l -v
  NAME            STATE           VERSION
* Ubuntu-20.04    Running         2
PS C:\Users>
Docker Engineのインストール
Docker Engineをインストールできる環境が整ったのでdocker docsの手順通りにインストールを進めました。
VSCodeのターミナルからUbuntuに接続をした後に以下のコマンドたちを実行していきました。
user:/# apt update
Err:1 http://security.ubuntu.com/ubuntu focal-security InRelease
  Temporary failure resolving 'security.ubuntu.com'
Err:2 http://archive.ubuntu.com/ubuntu focal InRelease
  Temporary failure resolving 'archive.ubuntu.com'
Err:3 http://archive.ubuntu.com/ubuntu focal-updates InRelease
  Temporary failure resolving 'archive.ubuntu.com'
Err:4 http://archive.ubuntu.com/ubuntu focal-backports InRelease
  Temporary failure resolving 'archive.ubuntu.com'
Reading package lists... Done
Building dependency tree
Reading state information... Done
All packages are up to date.
W: Failed to fetch http://archive.ubuntu.com/ubuntu/dists/focal/InRelease  Temporary failure resolving 'archive.ubuntu.com'
W: Failed to fetch http://archive.ubuntu.com/ubuntu/dists/focal-updates/InRelease  Temporary failure resolving 'archive.ubuntu.com'
W: Failed to fetch http://archive.ubuntu.com/ubuntu/dists/focal-backports/InRelease  Temporary failure resolving 'archive.ubuntu.com'
W: Failed to fetch http://security.ubuntu.com/ubuntu/dists/focal-security/InRelease  Temporary failure resolving 'security.ubuntu.com'
W: Some index files failed to download. They have been ignored, or old ones used instead.
さっそく、つまづきました。
WSLでは、明示的にnameserverの指定が必要なようです。
色々調査したところ、WSLを起動するたびにnameserverの指定をするresolv.confが自動生成されてしまい設定が初期化されてしまうようです。
そこでまずは、自動生成をされないようにwsl.confの設定を変更してからresolv.confの設定を変更しました。
vi /etc/wsl.conf
[network]
generateResolvConf = false #こちらがデフォルトだとtrueになっており、resolv.confが自動生成されないようにfalseに変更
rm /etc/resolv.conf #resolve.confがシンボリックリンクになっているようなので一度削除する
vi /etc/resolv.conf
nameserver 8.8.8.8nameserverの設定が完了したので改めてapt updateを実行すると正常に処理が完了しました。
引き続きドキュメント通りにコマンドを実行していきます。
user:/# apt update
Get:1 https://download.docker.com/linux/ubuntu focal InRelease [57.7 kB]
Hit:2 http://archive.ubuntu.com/ubuntu focal InRelease
Get:3 http://security.ubuntu.com/ubuntu focal-security InRelease [114 kB]
Get:4 http://archive.ubuntu.com/ubuntu focal-updates InRelease [114 kB]
Get:5 http://archive.ubuntu.com/ubuntu focal-backports InRelease [108 kB]
Get:6 http://archive.ubuntu.com/ubuntu focal-updates/main amd64 Packages [2612 kB]
Get:7 http://security.ubuntu.com/ubuntu focal-security/main amd64 Packages [2230 kB]
Get:8 http://archive.ubuntu.com/ubuntu focal-updates/main Translation-en [440 kB]
Get:9 http://archive.ubuntu.com/ubuntu focal-updates/main amd64 c-n-f Metadata [16.8 kB]
Get:10 http://archive.ubuntu.com/ubuntu focal-updates/universe amd64 Packages [1069 kB]
Get:11 http://archive.ubuntu.com/ubuntu focal-updates/universe Translation-en [254 kB]
Get:12 http://archive.ubuntu.com/ubuntu focal-updates/universe amd64 c-n-f Metadata [25.0 kB]
Get:13 http://security.ubuntu.com/ubuntu focal-security/main Translation-en [358 kB]
Get:14 http://security.ubuntu.com/ubuntu focal-security/main amd64 c-n-f Metadata [13.0 kB]
Get:15 http://security.ubuntu.com/ubuntu focal-security/universe amd64 Packages [844 kB]
Get:16 http://security.ubuntu.com/ubuntu focal-security/universe Translation-en [173 kB]
Get:17 http://security.ubuntu.com/ubuntu focal-security/universe amd64 c-n-f Metadata [18.5 kB]
Fetched 8447 kB in 4s (2059 kB/s)
Reading package lists... Done
Building dependency tree
Reading state information... Done
295 packages can be upgraded. Run 'apt list --upgradable' to see them.
apt-get install \
ca-certificates \
curl \
gnupg \
lsb-release curl -fsSL https://download.docker.com/linux/ubuntu/gpg | sudo gpg --dearmor -o /usr/share/keyrings/docker-archive-keyring.gpgecho \
"deb [arch=$(dpkg --print-architecture) signed-by=/usr/share/keyrings/docker-archive-keyring.gpg] https://download.docker.com/linux/ubuntu \
$(lsb_release -cs) stable" | sudo tee /etc/apt/sources.list.d/docker.list > /dev/nullapt-get updateapt-get install docker-ce docker-ce-cli containerd.io docker-compose-pluginここまででDocker Engineのインストールが完了したのでテスト用イメージをダウンロードしてコンテナで実行してみましたが・・・
user:/# docker run hello-world
Cannot connect to the Docker daemon at unix:///var/run/docker.sock. Is the docker daemon running?
どうやらDockerのサービスが起動していないようなのでサービスを起動させてみます。
user:/# service docker start
 * Starting Docker: docker                                                                                                                                     [ OK ]
これでDockerのサービスが起動したからテスト成功するだろう・・・再チャレンジ!
user:/# docker run hello-world
Cannot connect to the Docker daemon at unix:///var/run/docker.sock. Is the docker daemon running?
ウマクイキマセン
うーん?調査したところWSLでDockerを使うにはiptablesをレガシーに変更する必要があるようでした。
update-alternatives --set iptables /usr/sbin/iptables-legacy
update-alternatives --set ip6tables /usr/sbin/ip6tables-legacy
改めてDockerのサービスを起動して・・・
user:/# service docker start
 * Starting Docker: docker                                                                                                                                     [ OK ]
user:/# docker run hello-world
Hello from Docker!
This message shows that your installation appears to be working correctly.
To generate this message, Docker took the following steps:
1. The Docker client contacted the Docker daemon.
2. The Docker daemon pulled the "hello-world" image from the Docker Hub.
(amd64)
3. The Docker daemon created a new container from that image which runs the
executable that produces the output you are currently reading.
4. The Docker daemon streamed that output to the Docker client, which sent it
to your terminal.
To try something more ambitious, you can run an Ubuntu container with:
$ docker run -it ubuntu bash
Share images, automate workflows, and more with a free Docker ID:
https://hub.docker.com/
For more examples and ideas, visit:
https://docs.docker.com/get-started/
user:/# ナガカッタ・・・
ようやくDocker Engineのインストールとサービス起動ができました!!!
ここからNGINX Plusをコンテナに構築したいと思います!
NGINX Plusをコンテナに構築
NGINX Docsのページを参考に実施をしていきます。
手順通り、DockerFileを作成しました。
拡張子が必要だと思い込んでおり、少し悩みましたが拡張子は不要でした。
Dockerfileというファイル名で作成しました。
Dockerfileの内容は以下の通りです。
今回はNGINX Docsのページから特に変更を加えていません。
FROM debian:bullseye-slim

LABEL maintainer="NGINX Docker Maintainers <docker-maint@nginx.com>"

# Define NGINX versions for NGINX Plus and NGINX Plus modules
# Uncomment this block and the versioned nginxPackages block in the main RUN
# instruction to install a specific release
# ENV NGINX_VERSION   29
# ENV NJS_VERSION     0.7.12
# ENV PKG_RELEASE     1~bullseye

# Download certificate and key from the customer portal (https://account.f5.com)
# and copy to the build context
RUN --mount=type=secret,id=nginx-crt,dst=nginx-repo.crt \
    --mount=type=secret,id=nginx-key,dst=nginx-repo.key \
    set -x \
# Create nginx user/group first, to be consistent throughout Docker variants
    && addgroup --system --gid 101 nginx \
    && adduser --system --disabled-login --ingroup nginx --no-create-home --home /nonexistent --gecos "nginx user" --shell /bin/false --uid 101 nginx \
    && apt-get update \
    && apt-get install --no-install-recommends --no-install-suggests -y \
                        ca-certificates \
                        gnupg1 \
                        lsb-release \
    && \
    NGINX_GPGKEY=573BFD6B3D8FBC641079A6ABABF5BD827BD9BF62; \
    NGINX_GPGKEY_PATH=/usr/share/keyrings/nginx-archive-keyring.gpg; \
    export GNUPGHOME="$(mktemp -d)"; \
    found=''; \
    for server in \
        hkp://keyserver.ubuntu.com:80 \
        pgp.mit.edu \
    ; do \
        echo "Fetching GPG key $NGINX_GPGKEY from $server"; \
        gpg1 --keyserver "$server" --keyserver-options timeout=10 --recv-keys "$NGINX_GPGKEY" && found=yes && break; \
    done; \
    test -z "$found" && echo >&2 "error: failed to fetch GPG key $NGINX_GPGKEY" && exit 1; \
    gpg1 --export "$NGINX_GPGKEY" > "$NGINX_GPGKEY_PATH" ; \
    rm -rf "$GNUPGHOME"; \
    apt-get remove --purge --auto-remove -y gnupg1 && rm -rf /var/lib/apt/lists/* \
# Install the latest release of NGINX Plus and/or NGINX Plus modules
# Uncomment individual modules if necessary
# Use versioned packages over defaults to specify a release
    && nginxPackages=" \
        nginx-plus \
        # nginx-plus=${NGINX_VERSION}-${PKG_RELEASE} \
        # nginx-plus-module-xslt \
        # nginx-plus-module-xslt=${NGINX_VERSION}-${PKG_RELEASE} \
        # nginx-plus-module-geoip \
        # nginx-plus-module-geoip=${NGINX_VERSION}-${PKG_RELEASE} \
        # nginx-plus-module-image-filter \
        # nginx-plus-module-image-filter=${NGINX_VERSION}-${PKG_RELEASE} \
        # nginx-plus-module-perl \
        # nginx-plus-module-perl=${NGINX_VERSION}-${PKG_RELEASE} \
        # nginx-plus-module-njs \
        # nginx-plus-module-njs=${NGINX_VERSION}+${NJS_VERSION}-${PKG_RELEASE} \
    " \
    && echo "Acquire::https::pkgs.nginx.com::Verify-Peer \"true\";" > /etc/apt/apt.conf.d/90nginx \
    && echo "Acquire::https::pkgs.nginx.com::Verify-Host \"true\";" >> /etc/apt/apt.conf.d/90nginx \
    && echo "Acquire::https::pkgs.nginx.com::SslCert     \"/etc/ssl/nginx/nginx-repo.crt\";" >> /etc/apt/apt.conf.d/90nginx \
    && echo "Acquire::https::pkgs.nginx.com::SslKey      \"/etc/ssl/nginx/nginx-repo.key\";" >> /etc/apt/apt.conf.d/90nginx \
    && printf "deb [signed-by=/usr/share/keyrings/nginx-archive-keyring.gpg] https://pkgs.nginx.com/plus/debian `lsb_release -cs` nginx-plus\n" > /etc/apt/sources.list.d/nginx-plus.list \
    && mkdir -p /etc/ssl/nginx \
    && cat nginx-repo.crt > /etc/ssl/nginx/nginx-repo.crt \
    && cat nginx-repo.key > /etc/ssl/nginx/nginx-repo.key \
    && apt-get update \
    && apt-get install --no-install-recommends --no-install-suggests -y \
                        $nginxPackages \
                        curl \
                        gettext-base \
    && apt-get remove --purge -y lsb-release \
    && apt-get remove --purge --auto-remove -y && rm -rf /var/lib/apt/lists/* /etc/apt/sources.list.d/nginx-plus.list \
    && rm -rf /etc/apt/apt.conf.d/90nginx /etc/ssl/nginx \
# Forward request logs to Docker log collector
    && ln -sf /dev/stdout /var/log/nginx/access.log \
    && ln -sf /dev/stderr /var/log/nginx/error.log

EXPOSE 80

STOPSIGNAL SIGQUIT

CMD ["nginx", "-g", "daemon off;"]
作成したDockerfileとNGINX Plusのインストールに必要なnginx-repo.crtとnginx-repo.keyを同じディレクトリに格納しました。
以下のコマンドでDockerをビルドしてみます。
user:/# docker build --no-cache --secret id=nginx-key,src=nginx-repo.key --secret id=nginx-crt,src=nginx-repo.crt -t nginxplus .nginxplusという名前のdocker imanageが作成できたことを確認してみます!
user:/# docker images nginxplus
REPOSITORY   TAG       IMAGE ID       CREATED       SIZE
nginxplus    latest    a8735be59f9a   1 days ago   93.4MB
docker runコマンドでnginxplusを起動させます!
user:/# docker run --name mynginxplus -p 80:80 -d nginxplus
7617be1402cc4f83e5c638f4631b9a91b4ca8364ffb4ca5227549afe32f309bb
無事にコンテナにNGINX Plusをインストールできたので、docker psコマンドで確認してみます!
user:/# docker ps
CONTAINER ID   IMAGE       COMMAND                  CREATED          STATUS          PORTS                               NAMES
7617be1402cc   nginxplus   "nginx -g 'daemon of…"   47 seconds ago   Up 46 seconds   0.0.0.0:80->80/tcp, :::80->80/tcp   mynginxplus
ついにNGINX plusがインストールされたコンテナを起動することができました・・・!
本当にNGINX Plusが動いているのかcurlコマンドとブラウザアクセスでデフォルトのHTMLコンテンツが返ってくるか確認してみます!
user:/# curl localhost

<title>Welcome to nginx!</title>

html { color-scheme: light dark; }
body { width: 35em; margin: 0 auto;
font-family: Tahoma, Verdana, Arial, sans-serif; }

<h1>Welcome to nginx!</h1>
<p>If you see this page, the nginx web server is successfully installed and
working. Further configuration is required.</p>

<p>For online documentation and support please refer to
<a href="http://nginx.org/">nginx.org</a>.<br />
Commercial support is available at
<a href="http://nginx.com/">nginx.com</a>.</p>

<p><em>Thank you for using nginx.</em></p>
コンテンツが返ってきました!
Chromeブラウザからもアクセスしてみます!
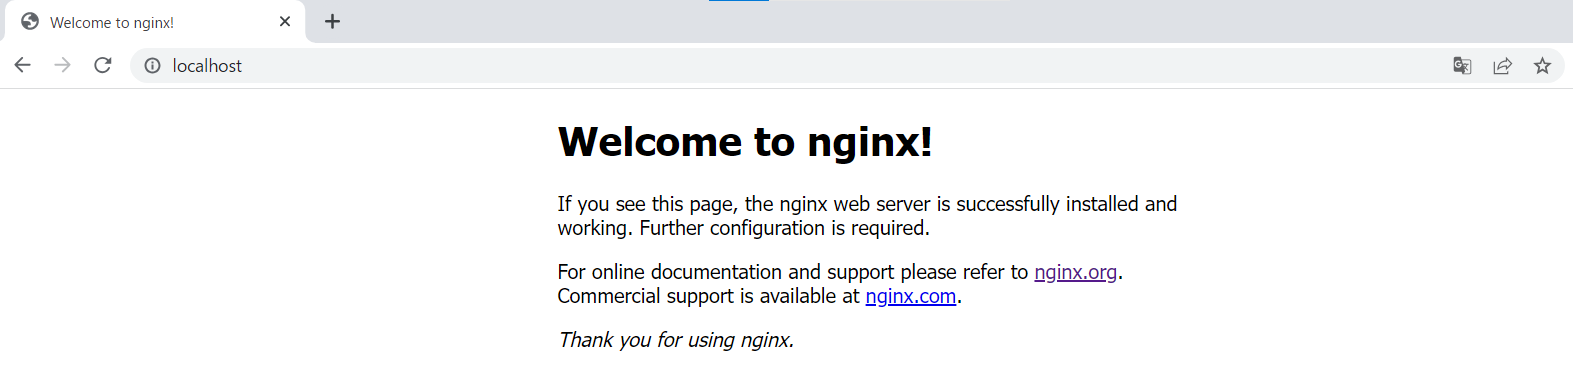
いろんなところでつまづきましたが、ようやくやりたいことができました!
最後に今回、つまづいた箇所をまとめたいと思います。
ハマったり、つまづいた箇所や疑問に思ったことのまとめ
-
管理者権限で実行したWindowsPowerShellにてインストールしたディストリビューションが表示されない
-WindowsPowerShellを管理者権限で実行しないことで表示されるようになった -
apt updateが失敗する(WSLからインターネットにアクセスできない)
-nameserverの設定を変更する必要がある -
WSLを起動するたびにnameserverの指定をするresolv.confが自動生成されてしまい設定が初期化されてしまう
-wsl.confの設定を変更してからresolv.confの設定を変更する -
Dockerのサービスが起動しない
-iptablesをレガシーに変更する必要がある -
DockerFileの拡張子は何か
-必要と思い込んでいただけで、DockerFileには拡張子不要
今回のブログは以上です。
最後まで読んでいただきありがとうございました!

この記事の投稿者Jo Nishikawa
セキュリティ製品のプリセールスを担当しています!
この記事をシェア